30 Eylül 2022 Cuma

Docker Compose ve Grafana

Örnek
Şöyle yaparız
grafana:
    image: grafana/grafana-oss:8.5.2
    pull_policy: always
    network_mode: host
    container_name: grafana
    restart: unless-stopped
    links:
      - prometheus:prometheus
    volumes:
      - ./data/grafana:/var/lib/grafana
    environment:
      - GF_SECURITY_ADMIN_PASSWORD=admin
      - GF_SERVER_DOMAIN=localhost
Örnek
Şöyle yaparız
version: '3.8'

services:
  prometheus:
    image: prom/prometheus:latest
    container_name: prometheus
    ports:
      - 9090:9090
    volumes:
      - ./prometheus.yml:/etc/prometheus/prometheus.yml
    command:
      - --config.file=/etc/prometheus/prometheus.yml
    depends_on:
      - mysql

  grafana:
    image: grafana/grafana:latest
    container_name: grafana
    ports:
      - 3000:3000
    depends_on:
      - prometheus
    environment:
      - GF_AUTH_ANONYMOUS_ENABLED=true
      - GF_AUTH_ANONYMOUS_ORG_ROLE=Admin
    volumes:
      - ./grafana:/var/lib/grafana

Örnek
Şöyle yaparız. Burada Grafana metadata'yı saklamak için PostgreSQL veri tabanını kullanıyor. Bağlanmak için http://<ip_of_the_host_machine>:3111 adresine gideriz.
version: '3.8'
services:
  ...
  pg_grafana:
    container_name: pg_grafana
    image: postgres:15
    restart: always
    environment:
      POSTGRES_DB: my_grafana_db
      POSTGRES_USER: my_grafana_user
      POSTGRES_PASSWORD: my_grafana_pwd
    ports:
      - "5499:5432"
    volumes:
      - pg_grafana:/var/lib/postgresql/data
  grafana:
    container_name: grafana
    image: grafana/grafana:latest
    user: "0:0"
    environment:
      GF_DATABASE_TYPE: postgres
      GF_DATABASE_HOST: pg_grafana:5432
      GF_DATABASE_NAME: my_grafana_db
      GF_DATABASE_USER: my_grafana_user
      GF_DATABASE_PASSWORD: my_grafana_pwd
      GF_DATABASE_SSL_MODE: disable
    restart: unless-stopped
    depends_on:
        - pg_grafana
    ports:
      - 3111:3000
    volumes:
      - grafana:/var/lib/grafana
volumes:
  pg_grafana:
    driver: local
  grafana:
    driver: local
grafana.ini Dosyası
Örnek
Şöyle yaparız
services:
  grafana:
    image: grafana/grafana:10.0.3
    ports:
      - 3000:3000
    volumes:
      - ./grafana/tmp:/var/lib/grafana
      - ./grafana/grafana.ini:/etc/grafana/grafana.ini
Şöyle yaparız
[paths]
data = /var/lib/grafana/data
logs = /var/log/grafana
plugins = /var/lib/grafana/plugins
[server]
http_port = 3000


Amazon Web Service (AWS) - Storage Services

Giriş
Karşılaştırması şöyle
TYPE AWS GOOGLE CLOUD
Persistent Block storage Amazon Elastic Block Store Persistent Disk
Ephemeral Block storage Instance Store Local SSDs
Object storage Amazon S3 (Simple Storage Service) Cloud Storage
Infrequent Access Object Storage Amazon S3 - Standard-IA, One Zone-IA Cloud Storage - Nearline and Coldline classes
Archival Object Storage Amazon Glacier Cloud Storage - Archive class
File storage Amazon Elastic File System Filestore
Amazon Elastic Block Store (EBS)
Açıklaması şöyle
Amazon Elastic Block Store (EBS) is a cloud-based block storage service, typically used for storing EC2 instances. There are two main categories of ECS volumes—hard-disk drives (HDD) and solid-state drives (SSD). You can store snapshots of EBS volumes in Amazon Simple Storage Service (Amazon S3) buckets, and transfer replicas across AWS regions as needed.
Amazon S3 - Simple Storage Service - Object Storage
AWS S3 yazısına taşıdım

Google Cloud Veri Tabanları

Google Cloud ve AWS karşılaştırması şöyle
QUESTION AWS GOOGLE CLOUD
How do you create relational OLTP databases? Amazon RDS (Amazon Aurora) Cloud SQL, Cloud Spanner
What is the relational data warehouse solution? Amazon Redshift BigQuery
What are the NoSQL database options? Amazon DynamoDB, Amazon DocumentDB Datastore/Firestore, Cloud Bigtable
How do you cache data from a database? Amazon ElastiCache Memorystore
Relational OLTP Veri Tabanı
1. Cloud SQL. Açıklaması şöyle
MySQL, PostgreSQL, SQL server DBs
2. Cloud Spanner. Açıklaması şöyle
Unlimited scale and 99.999% availability for global applications with horizontal scaling

Relational OLAP Veri Tabanı - Datawarehouse İçindir
BigQuery 

No SQL Veri Tabanı
1. Cloud Firestore - NoSQL Document Database
2. Cloud BigTable - Wide Column NoSQL Veri Tabanı

In memory Veri Tabanı/caches
Cloud Memorystore. Açıklaması şöyle. Altta Redis kullanır. Yani Microsoft Azure Cache for Redis gibidir
A fully managed Redis service in the Google Cloud Platform

BigQuery - Datawarehouse
Datawarehouse içindir. Açıklaması şöyle. Serverless bir servis olduğu için otomatik olarak ölçeklenir
The service can rapidly analyze terabytes to petabytes of data.

Unlike Redshift, BigQuery doesn’t require upfront provisioning and automates various back-end operations such as data replication or scaling of computing resources. It encrypts data at rest and in transit automatically.

The BigQuery architecture consists of several components. Borg is the overall compute part, while Colossus is the distributed storage. The execution engine is called Dremel, and Jupiter is the network.
Şeklen şöyle


Docker ve Elasticsearch

Örnek
Şöyle yaparız. Böylece https://localhost:9200 adresinden erişebiliriz
docker pull docker.elastic.co/elasticsearch/elasticsearch:8.3.2

docker network create elastic

docker run --name es01 
           --net elastic 
           -p 9200:9200 -p 9300:9300 
            -it docker.elastic.co/elasticsearch/elasticsearch:8.3.2

docker cp es01:/usr/share/elasticsearch/config/certs/http_ca.crt .
Şöyle yaparız
curl --cacert http_ca.crt -u elastic https://localhost:9200
discovery.type Alanı

Örnek
Şöyle yaparız
# Custom network
docker network create sat-elk-net

docker run -d --name sat-elasticsearch \
  --net sat-elk-net \
  -p 9200:9200 \
  -p 9300:9300 \
  -e "discovery.type=single-node" \
  elasticsearch:7.17.4

# ElasticHQ Management Tool
docker run -d --name sat-elastichq \
  --net sat-elk-net \
  -p 5000:5000 \
  elastichq/elasticsearch-hq
Şöyle yaparız
# Disable XPack in Elasticsearch
docker exec -it <container_id> bash
cd /usr/share/elasticsearch/config
echo "xpack.security.enabled: false" >> elasticsearch.yml
xpack.security.enabled Alanı
Açıklaması şöyle
Elasticsearch 8 comes with SSL/TLS enabled by default, I disabled security with the environment variable “xpack.security.enabled=false”. If security remains enabled, configuring the Elasticsearch client will require setting up a proper SSL connection.
Örnek
Şöyle yaparız
docker run -p 9200:9200 \
  -e "discovery.type=single-node" \
  -e "xpack.security.enabled=false" \
  docker.elastic.co/elasticsearch/elasticsearch:8.8.1


Cloud Computing - Platform as a service - PaaS - Genellikle Bulut Sağlayıcısı Tarafından Sunulur

Giriş
Genellikle bulut sağlayıcısı tarafından sunulur. Açıklaması şöyle. Yani geliştirici koduna odaklanıyor ve geri kalan altyapısal şeyleri PaaS platformu sağlıyor
PaaS (Platform as a Service) is essentially having the cloud provider host and manage both the infrastructure and database components. PaaS services vary, but in nearly all cases, backups, high availability, and patching are taken care of by the cloud vendor. In some cases, your service may auto scale with the workload.
Heroku, Google App Engine, Azure App Service gibi PaaS sağlayıcıları var

Heroku
Örnek
Bir örnek şöyle
And finally, Platform as a Service (PaaS) providers like Heroku have spent the last decade working out how to outsource not only application hosting but also the add-on marketplace. They take care of the infrastructure and the platform with pre-configured installations of a wide variety of technology stacks. You can kick the tires on third party suppliers, get ideas to market in just hours, and easily pay for their services through one bill.  
Örneğin Heroku Streaming Data Connectors yeteneği sağlar. Bu yetenek şu işe yarar.
The way this works is that you add a managed Kafka and a "data connector" to your Heroku application, defining the tables and columns where changes should generate events. Then, you can set up your new microservices to consume events from Kafka topics.
 Böylece Change Data Capture (CDC) işlevi çalışmaya başlar. Bu işlev ile şunu yapabiliriz.
Say you want to add an onboarding email flow to your application, so that new users receive helpful emails over the course of several days after they create an account. Using CDC, you can create this new flow as a microservice. Whenever a new user record is added to your main users table, a new event is created. Then, your new microservice would consume that event and manage the onboarding process, without requiring any further changes to your main legacy application. Another example would be to send users an exit survey after they deleted their account, to capture data on why your service no longer meets their requirements.

22 Eylül 2022 Perşembe

Grafana Dashboard Import

Giriş
Hazır Dashboard'lar burada

Şeklen şöyle


Örnek -  Spring Boot HikariCP / JDBC
6083 numaralı dashboard. Açıklaması burada. Bir örnek burada


Örnek - Kubernetes cluster monitoring (via Prometheus)
Açıklaması burada. Bir örnek burada.
Create the Dashboard
  • In Grafana we can create various kinds of dashboards as per our need
  • We also have pre-created dashboards in Grafana and we can import them using the Dashboard number.
  • For this tutorial we will import one of the pre-created dashboard
  • Click on Import and add 3119 (ID of dashboard)
  • It will import below dashboard

21 Eylül 2022 Çarşamba

Jenkins Manage Nodes - Master ve Slave

Giriş
Master ve Agent arasında bağlantı için 3 yöntem var
1. SSH Connector
2. Inbound Connector
3. Custom Script

1. Master'ın public key Agent üzerindeki "/home/jenkins/.ssh/authorized_keys" dosyasına kopyalanır. authorized_keys Dosyası yazısına bakabilirsiniz
2. Master'dan Agent'a ssh komutuyla yani elle bir ssh bağlantısı açılır
3. Bu bağlantının neticesinde güncellenen known_hosts dosyasını tekrar Jenkins'e kopyalanır
sudo cp ~/.ssh/known_hosts /var/lib/jenkins/.ssh
known_hosts Dosyası yazısına bakabilirsiniz
4. Master Jenkins'e yeni bağlantı için private key ekrandan girilir

Örnek
1. Soldaki Manage Jenkins menüsüne tıklanır
2. Manage Nodes and Clouds düğmesine tıklanır
3. Sol tarafta New Node menüsüne tıklanır
4. Node ismi girilir, ayrıca " Permanent agent" seçeneği de seçilir
Ekrandaki bazı alanların açıklaması şöyle
Name : Enter the name of slave node

Description : Enter the detailed description of the slave node

Number of Executor: This means that no. of jobs in the slave machine can run parallelly based on the count is given in the text box. Here is given as 1 (it can be change based on the user specification for execution), 

Label: Enter the label name of the slave machine.

Usage: In this field, two options are available ,one is "Use this node as much as possibl"e and another one is "Only build jobs with label expressions matching this node". Here is selected as option1 (Use this node as much as possible)

Launch Method : Select the option "Launch agent by connecting it to the controller(Master)

Custom WorkDir path :Enter the slave workspace directory(path) in this field.

Internal data Directory : Here is used “remoting” as value. And Choose the Use WebSocket option.

In Availability : Select the option as “Keep this agent online as much as possible” and Click on “Save” button.

Jenkins node'larını yönetmek için şöyle yaparız
Yeni node eklemek için şöyle yaparız. Burada "Permanent Agent" seçiliyor

SSH ile bağlanacağımız için şöyle yaparız


Canary Deployment - Canlıya Geçirme - Yükün Belli Bir Yüzdesi Yeni Sisteme Verilir

Giriş
Açıklaması şöyle.  İki farklı deployment yan yana çalışır. Yükün belli bir yüzdesi yeni sisteme verilir
Canary deployment strategy is used to carry out A/B testing and dark launches. It is similar to the blue-green approach but more controlled. We will see slow-moving traffic from version A to version B in this strategy. Think: canary in the coal mine!
Yüzde ile ilgili açıklam şöyle
Finally, in a Canary deployment, a new application replica is added to the load balancer, and the load balancer is configured to pass only a specific percentage of the application traffic to the new replica. Once configured, a full analysis of the traffic volume, response times, or activity on the replica is performed. If the analysis is successful, this deployment generally continues as a Rolling deployment.
Örnek
Şöyle yaparız. Tek path var. 
apiVersion: networking.k8s.io/v1
kind: Ingress
metadata:
  name: sample-api-ing
  namespace: default
  annotations:
    nginx.ingress.kubernetes.io/rewrite-target: /$1 
spec:
  rules:
    - host: sample-api.com
      http:
        paths:
          - path: /
            pathType: Prefix
            backend:
              service:
                name: sample-api-svc
                port:
                  number: 8080
Service şöyledir. Bu service Ingress tarafından kullanıldığı için type ClusterIP
apiVersion: v1
kind: Service
metadata:
  name: sample-api-svc
  namespace: default
  labels:
    app: sample-api
spec:
  type: ClusterIP         <----
  selector:
    app: sample-api
  ports:
  - port: 8080
    name: "http"
    protocol: TCP
Birinci deployment şöyle. Bu deployment .net ile gerçekleştiriliyor.
apiVersion: apps/v1
kind: Deployment
metadata:
  name: sample-api-app              <----
  namespace: default
spec:
  replicas: 4                       <----
  selector:
    matchLabels:
      app: sample-api
  strategy:
    type: RollingUpdate
    rollingUpdate:
      maxSurge: 1
      maxUnavailable: 20%
  template:
    metadata:
      labels:
        version: "netcore6"         <----
        app: sample-api
    spec:
      containers:
      - name:  sample-api
        image: localhost:5000/sample-api-netcore
        imagePullPolicy: Always
        ports:
        - containerPort: 8080
        env:
        - name: ASPNETCORE_URLS 
          value: http://*:8080
İkinci deployment şöyle. Bu deployment GoLang ile gerçekleştiriliyor.
apiVersion: apps/v1
kind: Deployment
metadata:
  name: sample-api-canary-app         <----
  namespace: default
spec:
  replicas: 1                         <----
  selector:
    matchLabels:
      app: sample-api
  strategy:
    type: RollingUpdate
    rollingUpdate:
      maxSurge: 1
      maxUnavailable: 20%
  template:
    metadata:
      labels:
        version: "golang"             <----
        app: sample-api
    spec:
      containers:
      - name:  sample-api
        image: localhost:5000/sample-api-golang
        imagePullPolicy: Always
        ports:
        - containerPort: 8080
Böylece iki farklı deployment yan yana çalışıyor.


Grafana Kubernetes Deployment

Giriş
1. Önce bir Data Source eklenir. Data Source ConfigMap'in volume olarak yüklenmesi ile olur. ConfigMap'teki data ismi "prometheus.yaml" olmalıdır

2. Deployment yapılır. Deployment tercihen persistent volume kullanır. Böylece ayarlar saklanabilir
Mutlaka olması gereken volume'lar şöyle
1. /var/lib/grafana
2. /etc/grafana/provisioning/datasources

Hazır dashboard kullanmak istiyorsak bunlar şöyle olabilir
1. /etc/grafana/provisioning/dashboards
2. /grafana-dashboard-definitions/0/pods

3. Dashboard yaratılır

Helm
Şöyle yaparız
> helm repo add grafana https://grafana.github.io/helm-charts
> helm pull grafana/grafana --untar --untardir helm
Örnek
Şöyle yaparız. Burada storageClassName bir ortam değişkeni
kind: PersistentVolumeClaim
apiVersion: v1
metadata:
  name: grafana-storage
spec:
  accessModes:
    - ReadWriteOnce
  resources:
    requests:
      storage: 1Gi
  storageClassName: STORAGE_CLASS_TYPE
Deployment için şöyle yaparız. Burada 3 tane ConfigMap kullanılıyor. Birincisi Data Source için. Diğer ikisi de hazır Dashboard için. "configMap:name" için kullanılan isim ile kind: ConfigMap içindeki metadata:name aynı olmalı
apiVersion: apps/v1
kind: Deployment
metadata:
  labels:
    app: grafana
  name: grafana
spec:
  replicas: 1
  selector:
    matchLabels:
      app: grafana
  template:
    metadata:
      labels:
        app: grafana
    spec:
      containers:
      - image: grafana/grafana:GRAFANA_VERSION
        name: grafana
        ports:
        - containerPort: 3000
          name: http
        resources:
          limits:
            cpu: 200m
            memory: 200Mi
          requests:
            cpu: 100m
            memory: 100Mi
        volumeMounts:
        - mountPath: /var/lib/grafana
          subPath: grafana
          name: grafana-storage
          readOnly: false
        - mountPath: /etc/grafana/provisioning/datasources
          name: grafana-datasources
          readOnly: false
        - mountPath: /etc/grafana/provisioning/dashboards
          name: grafana-dashboards
          readOnly: false
        - mountPath: /grafana-dashboard-definitions/0/pods
          name: grafana-dashboard-pods
          readOnly: false
      securityContext:
        runAsNonRoot: true
        runAsUser: 65534
        fsGroup: 472
      serviceAccountName: grafana
      volumes:
      - persistentVolumeClaim:
          claimName: grafana-storage
        name: grafana-storage
      - name: grafana-datasources
        configMap:
          name: grafana-datasources
      - configMap:
          name: grafana-dashboards
        name: grafana-dashboards
      - configMap:
          name: grafana-dashboard-pods
        name: grafana-dashboard-pods
Data Source için ConfigMap şöyle
apiVersion: v1
kind: ConfigMap
metadata:
  name: grafana-datasources
data:
  prometheus.yaml: |-
    {
        "apiVersion": 1,
        "datasources": [
            {
                "access": "proxy",
                "editable": false,
                "name": "prometheus",
                "orgId": 1,
                "type": "prometheus",
                "url": "http://prometheus-k8s.CUSTOM_NAMESPACE.svc:9090",
                "version": 1
            }
        ]
    }
Dashboardlar için ConfigMap burada

Örnek
Bur örnekte dashboard kopyalanıyor. Deployment şöyle. Burada "grafana-storage" isimli volumeMounts bir PVC'ye atıfta bulunmuyor. Aksine aynı yaml'daki "volume" tanımına atıfta bulunuyor
apiVersion: apps/v1
kind: Deployment
metadata:
  name: grafana
  namespace: monitoring
spec:
  replicas: 1
  selector:
    matchLabels:
      app: grafana
  template:
    metadata:
      name: grafana
      labels:
        app: grafana
    spec:
      containers:
      - name: grafana
        image: grafana/grafana:latest
        ports:
        - name: grafana
          containerPort: 3000
        resources:
          limits:
            memory: "1Gi"
            cpu: "1000m"
          requests: 
            memory: 500M
            cpu: "500m"
        volumeMounts:
          - mountPath: /var/lib/grafana
            name: grafana-storage
          - mountPath: /etc/grafana/provisioning/datasources
            name: grafana-datasources
            readOnly: false
      volumes:
        - name: grafana-storage
          emptyDir: {}
        - name: grafana-datasources
          configMap:
              defaultMode: 420
              name: grafana-datasources
Data Source için ConfigMap şöyle
apiVersion: v1
kind: ConfigMap
metadata:
  name: grafana-datasources
  namespace: monitoring
data:
  prometheus.yaml: |-
    {
        "apiVersion": 1,
        "datasources": [
            {
               "access":"proxy",
                "editable": true,
                "name": "prometheus",
                "orgId": 1,
                "type": "prometheus",
                "url": "http://prometheus-service.monitoring.svc:8080",
                "version": 1
            }
        ]
    }


Grafana Dashboard Genel Görünüm

Dashboard Genel Görünüm
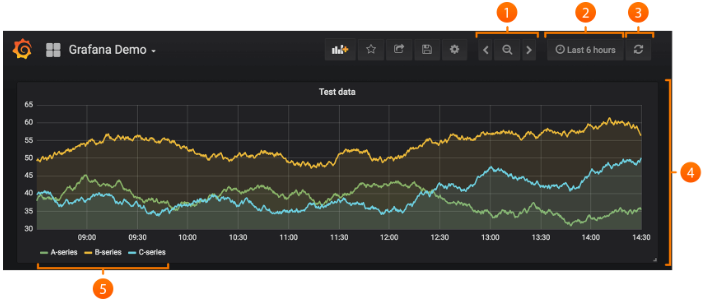
Örnek bir dashboard şöyle
Açıklaması şöyle
1.Zoom out time range
2. Time picker dropdown. Here you can access relative time range options, auto-refresh options and set custom absolute time ranges.
3. Manual refresh button. Will cause all panels to refresh (fetch new data).
4. Dashboard panel. Click the panel title to edit panels.
5. Graph legend. You can change series colors, y-axis and series visibility directly from the legend.
1. Dashboard'a birden fazla satır eklenebilir.
2. Her satırda bir veya daha fazla panel bulunur. 
Paneller için açıklama şöyle
The panel is the basic visualization building block in Grafana. Each panel has a query editor specific to the data source selected in the panel. The query editor allows you to extract the perfect visualization to display on the panel. With the exception of a few special use panels, a panel is a visual representation of one or more queries. The queries display data over time. This can range from temperature fluctuations to current server status to a list of logs or alerts. In order to display data, needs to have at least one data source added to Grafana.

There are a wide variety of styling and formatting options for each panel. Panels can be dragged and dropped and rearranged on the dashboard. They can also be resized.

Drag and drop panels by clicking and holding the panel title, then dragging it to its new location. it can also easily resize panels by clicking the (-) and (+) icons.
Templates and variables
Açıklaması şöyle
A template is any query that contains a variable.
For example : 
wmi_system_threads{instance=~"$server"}
Variable syntax
Açıklaması şöyle
Panel titles and metric queries can refer to variables using two different syntaxes:

- $varname This syntax is easy to read, but it does not allow users to use a variable in the middle of a word. Example: apps.frontend.$server.requests.count
- ${var_name} Use this syntax when the user wants to interpolate a variable in the middle of an expression.
- ${var_name:<format>} This format gives users more control over how Grafana interpolates values.
- [[varname]] Do not use it. Deprecated old syntax, will be removed in a future release.

Before queries are sent to the data source the query is interpolated, meaning the variable is replaced with its current value. During interpolation, the variable value might be escaped in order to conform to the syntax of the query language and where it is used. For example, a variable used in a regex expression in an InfluxDB or Prometheus query will be regex escaped. Read the data source specific documentation topic for details on value escaping during interpolation.
Variable values are always synced to the URL using the syntax var-<varname>=value.
Variable best practices
- Variable drop-down lists are displayed in the order they are listed in the variable list in Dashboard settings.
-  Put the variables that you will change often at the top, so they will be shown first (far left on the dashboard).
Örnek
Şöyle yaparız. Burada $__timeFilter bir değişken. Grafana dashboard ile seçili zaman aralığını temsil ediyor.
SELECT 
  UNIX_TIMESTAMP(date_format(created_date,'%Y-%m-%d %H:%i')) as time_sec,
  count(*) as value,
  variable_name as metric
FROM dashboard.service_response_time
  WHERE $__timeFilter(created_date)
  GROUP BY time_sec,variable_name
  ORDER BY time_sec ASC;

Dashboard Başlığı
Şeklen şöyle

Açıklaması şöyle
1. Side menubar toggle: This toggles the side menu, allowing you to focus on the data presented in the dashboard. The side menu provides access to features unrelated to a Dashboard such as Users, Organizations, and Data Sources.
2. Dashboard dropdown: This dropdown shows you which Dashboard you are currently viewing, and allows you to easily switch to a new Dashboard. From here you can also create a new Dashboard or folder, import existing Dashboards, and manage Dashboard playlists.
3. Add Panel: Adds a new panel to the current Dashboard
4. Star Dashboard: Star (or unstar) the current Dashboard. Starred Dashboards will show up on your own Home Dashboard by default, and are a convenient way to mark Dashboards that you’re interested in.
5. Share Dashboard: Share the current dashboard by creating a link or create a static Snapshot of it. Make sure the Dashboard is saved before sharing.
6. Save dashboard: The current Dashboard will be saved with the current Dashboard name.
7. Settings: Manage Dashboard settings and features such as Templating and Annotation
Time range controls
Şeklen şöyle

"Last X" şeklinde göreceli veya "Absolute Time" şeklinde mutlak zaman girilebilir.


Grafana Data Source Ekleme

Data Source Olarak AWS Cloud Watch
Add data source ile şöyle yaparız

Bağlantı bilgileri için şöyle yaparız

Açıklaması şöyle
The updated CloudWatch data source ships with pre-configured dashboards for five of the most popular AWS services:

1. Amazon Elastic Compute Cloud Amazon EC2,

2. Amazon Elastic Block Store Amazon EBS,

3. AWS Lambda AWS Lambda,

4. Amazon CloudWatch Logs Amazon CloudWatch Logs, and

5. Amazon Relational Database Service Amazon RDS.
Dashboards sekmesi şeklen şöyle


Data Source Olarak PostgreSQL
Bir örnek burada. Eğer bunu yaparsak PostgreSQL veri tabanına SELECT vs gibi SQL çağrıları yapabiliriz

Data Source Olarak Prometheus
Dashboard ekranından "Add Data Source" seçilir. Şeklen şöyle

veya menü kullanılır. Şeklen şöyle


Prometheus seçilir. Şeklen şöyle

Prometheus ayarları girilir.  Şeklen şöyle
Örneğin Prometheus sunucusunun http adresi girilir ve "Save and Test" düğmesi tıklanır. 

Artık dash board ekranından data source Prometheus yapılırsa bilgiler görülebilir ve 
Prometheus ile gelen counter, gauge gibi araçlar ana dashboard ekranına eklenebilir

Örnek
Data Source olarak Prometheus ekledikten sonra ayarları gösteren bir başka şekil şöyle


19 Eylül 2022 Pazartesi

Amazon Web Service (AWS) CodeDeploy ve CodePipeline

Giriş
Açıklaması şöyle
AWS CodeDeploy and AWS CodePipeline are two AWS deployment services. AWS CodeDeploy automates the deployment of code to an EC2 instance. After we commit any changes to a specific branch, CodePipeline builds, tests, and deploys our application.
Adımlar şöyle
The basic steps are below:
1. Prepare Spring boot application and push it to GitHub
2. Setup IAM role. We will need two IAM role. Role for EC2 and Code deploy. EC2 role will require S3 and code deploy permission.
3. Launch EC2 instance
4. Create application in code deploy
5. Setup code pipeline
IAM ve geri kalan her tüm ekranları gösteren bir örnek burada

buildspec.yml
Projeyi yapılandırır
Örnek
Şöyle yaparız. Burada JDK 11 Correto ve maven kullanılıyor
version: 0.2

phases:
  install:
    runtime-versions:
      java: corretto11
  build:
    commands:
      - mvn clean install
  post_build:
    commands:
      - echo Build completed
artifacts:
  files:
    - target/*.jar
    - scripts/*.sh
    - appspec.yml
  discard-paths: yes
appspec.yml
Örnek
Şöyle yaparız
version: 0.0
os: linux

files:
  - source: /
    destination: /home/ec2-user/server

permissions:
  - object: /
    pattern: "**"
    owner: ec2-user
    group: ec2-user

hooks:
  BeforeInstall:
    - location: server_clear.sh
      timeout: 300
      runas: ec2-user
  AfterInstall:
    - location: fix_privileges.sh
      timeout: 300
      runas: ec2-user
  ApplicationStart:
    - location: server_start.sh
      timeout: 20
      runas: ec2-user
  ApplicationStop:
    - location: server_stop.sh
      timeout: 20
      runas: ec2-user
Açıklaması şöyle
This will copy files to /home/ec2-user/server folder that I mentioned in the artifacts part of the buildspec.yml. Hooks allow us to run different scripts at different stages of the deployment. In the start script, I added the command to run the jar and open port 80 so we can access the API.


Kalman Filtresi

Giriş
Kontrol teorisini bilmeden Kalman Filtresini anlamak kolay değil.

Kalman filtresi periyodik ölçüm ile çalışır. Açıklaması şöyle.
1. Kalman Filters are discrete. That is, they rely on measurement samples taken between repeated but constant periods of time. Although you can approximate it fairly well, you don't know what happens between the samples.
2. Kalman Filters are recursive. This means its prediction of the future relies on the state of the present (position, velocity, acceleration, etc) as well as a guess about what any controllable parts tried to do to affect the situation (such as a rudder or steering differential).
3. Kalman Filters work by making a prediction of the future, getting a measurement from reality, comparing the two, moderating this difference, and adjusting its estimate with this moderated value.
4. The more you understand the mathematical model of your situation, the more accurate the Kalman filter's results will be.
5. If your model is completely consistent with what's actually happening, the Kalman filter's estimate will eventually converge with what's actually happening.
Bazı kavramların açıklaması şöyle.
State Prediction (Predict where we're gonna be)
Covariance Prediction (Predict how much error)
Innovation (Compare reality against prediction)
Innovation Covariance (Compare real error against prediction)
Kalman Gain (Moderate the prediction)
State Update (New estimate of where we are)
Covariance Update (New estimate of error)
Covariance bir şeyin ne kadar güvenilir olduğunu gösterir. Yan genel anlamda covariance'ın düşük olması iyidir.


15 Eylül 2022 Perşembe

What Is Configuration Testing in Software Testing?

Giriş
Bu konuyu ilk defa burada gördüm. Açıklaması şöyle
Configuration testing is a type of testing that is performed to verify the best possible performance of a system and the least and most appropriate configuration that does not result in bugs and defects.

Configuration testing ensures your app functions with as many different hardware elements as possible. For this purpose, it is tried out on different supported system configurations, by which we mean combinations of operating systems, browsers, drivers, etc. For example, Oracle Database and MySQL (databases), Chrome and Microsoft Edge (browsers), etc. The idea is to figure out whether the app is suitable for all of them or not. Every combination of software and hardware is incorporated into the testing process. The team detects the most suitable one among them.

And now, let us consider what is meant by configuration testing from the perspective of its objectives.


Jenkins Kurulum

Sadece War Dosyası
Jenkins'i indirdikten sonra eğer war dosyasını elle çalıştırmak istersek şöyle yaparız.
java -jar jenkins.war
Proxy tanımlamak istersek şöyle yaparız.
java -DJENKINS_HOME="C:\.jenkins" -Dhudson.model.DirectoryBrowserSupport.CSP
="`script-src 'unsafe-inline';`" -Dhttp.proxyHost=localhost -Dhttp.proxyPort=312
8 -Dhttps.proxyHost=localhost -Dhttps.proxyPort=3128 -jar %JENKINS_HOME%\jenkins
.war

Tomcat
Kurulum için  war dosyası şuraya kopyalanır
$TOMCAT_HOME/web-app/jenkins.war
Şu adrese gideriz.
http://localhost:8080/jenkins
Docker
Örnek
Şöyle yaparız
docker  network create jenkins

docker run \
--name myjenkins \
--rm \
--detach \
-p 8088:8080 -p 50000:50000 \
-v ~/project/Jenkins_Test/CD-CD-deployment/volume/:/var/jenkins_home \
jenkins/jenkins:lts
İlk şifre şurada
cat Jenkins_Test/CD-CD-deployment/volume/secrets/initialAdminPassword

Ubuntu
Örnek
Şöyle yaparız
How to setup Jenkins on Ubuntu:

1. This is the Debian package repository of Jenkins to automate installation and upgrade. To use this repository, first add the key to your system.

curl -fsSL https://pkg.jenkins.io/debian-stable/jenkins.io.key | sudo tee \
/usr/share/keyrings/jenkins-keyring.asc > /dev/null
2. Then add a Jenkins apt repository entry:

echo deb [signed-by=/usr/share/keyrings/jenkins-keyring.asc] \
https://pkg.jenkins.io/debian-stable binary/ | sudo tee \
/etc/apt/sources.list.d/jenkins.list > /dev/null
3. Update your local package index, then finally install Jenkins:

sudo apt-get update
sudo apt-get install fontconfig openjdk-11-jre
sudo apt-get install jenkins

4. Verify:

jenkins --version
veya şöyle yaparız
$ systemctl status Jenkins
Kurduktan sonra localhost:8080 adresine gidersek karşımıza şu ekran çıkar

İlk şifre şurada
$ cat /var/lib/jenkins/secrets/initialAdminPassword